> ## Documentation Index
> Fetch the complete documentation index at: https://docs.irisagent.com/llms.txt
> Use this file to discover all available pages before exploring further.
# Chatbot Automation on Zendesk Messaging
> Deploy IrisAgent AI answers to your Zendesk Messaging Chatbot
This guide walks you through setting up the Zendesk Sunshine Conversations (aka Zendesk Messaging) integration with IrisAgent.
## Prerequisites
Before setting up the Conversations integration, you must have **Messaging for Web** configured in your Zendesk account. This integration requires a functioning Web Widget to communicate with your customers.
### Setting Up Messaging for Web
If you haven't already set up messaging, follow the official Zendesk guide: [Getting started with messaging for your website, help center, and mobile apps](https://support.zendesk.com/hc/en-us/articles/4408827701530-Getting-started-with-messaging-for-your-website-help-center-and-mobile-apps)
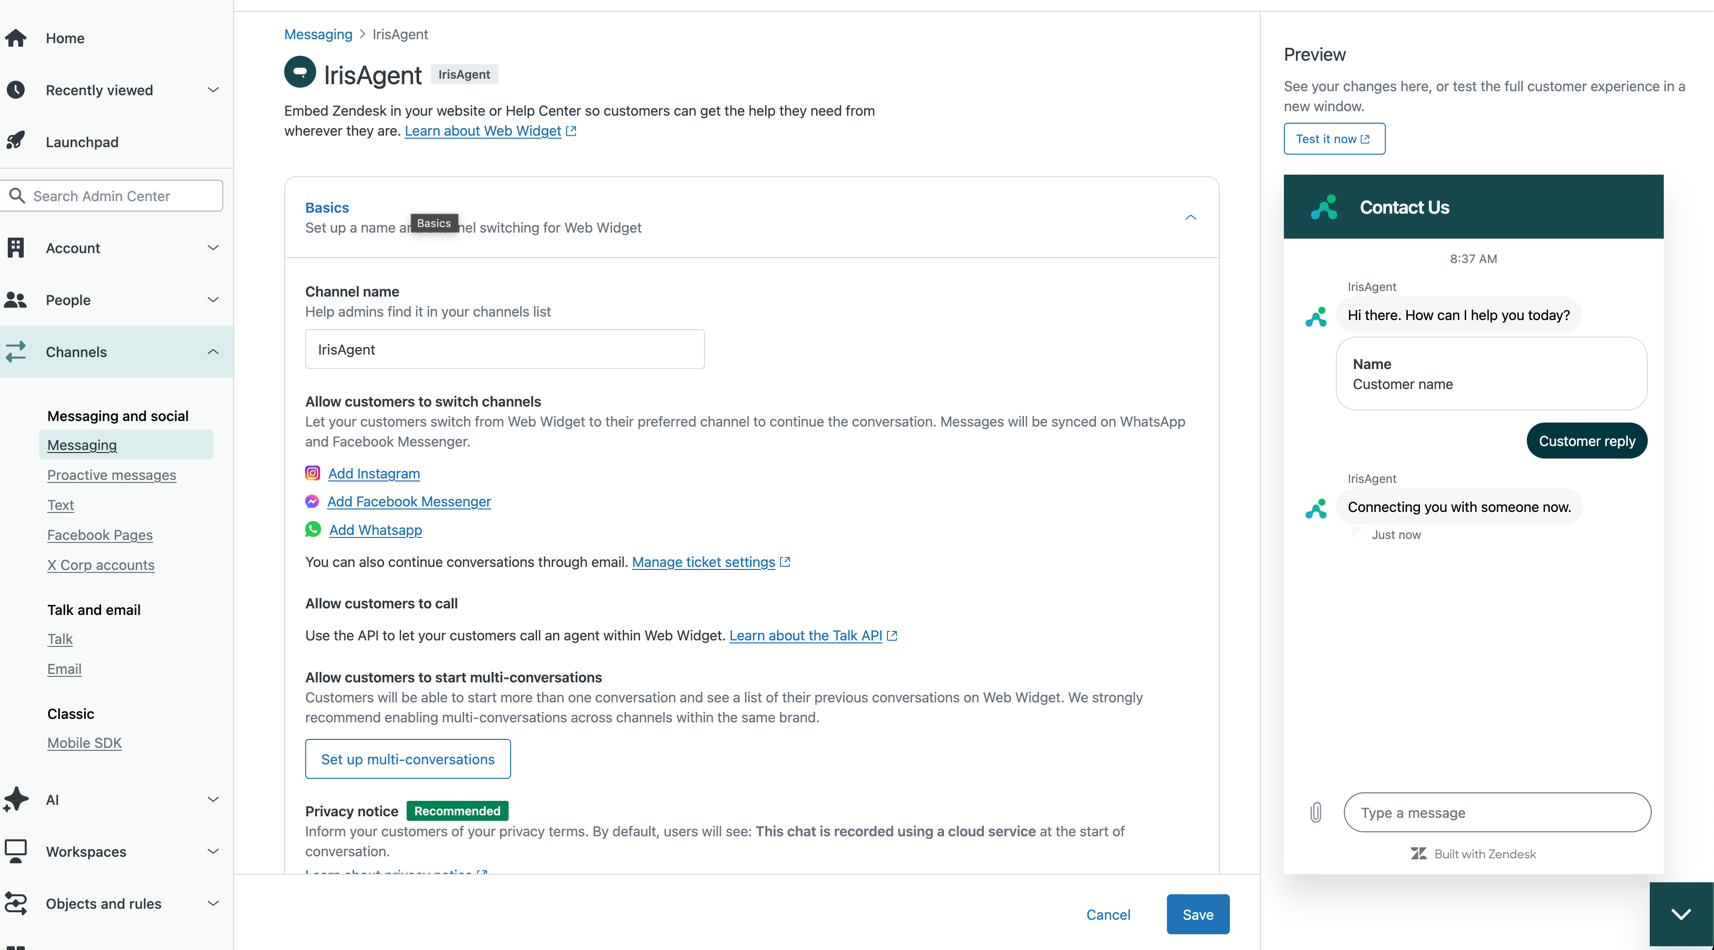 **Key steps:**
1. Create a messaging channel (automatically enabled in your account)
2. Configure and customize your Web Widget appearance
3. Install the Web Widget code on your website or help center
4. Set up ticket routing and agent access
***
## Step 1: Create a Conversations Integration
Create a new Conversations integration to establish a bidirectional connection between Zendesk and IrisAgent.
**Follow the official guide:** [Creating conversations integrations in Admin Center](https://support.zendesk.com/hc/en-us/articles/4576083789850-Creating-conversations-integrations-in-Admin-Center)
### Configuration Steps
1. In Zendesk Admin Center, navigate to **Apps and integrations** > **Integrations** > **Conversations integrations**
2. Click **Create integration** and give it a descriptive name (e.g., "IrisAgent Integration")
3. Configure the webhook settings:
**Key steps:**
1. Create a messaging channel (automatically enabled in your account)
2. Configure and customize your Web Widget appearance
3. Install the Web Widget code on your website or help center
4. Set up ticket routing and agent access
***
## Step 1: Create a Conversations Integration
Create a new Conversations integration to establish a bidirectional connection between Zendesk and IrisAgent.
**Follow the official guide:** [Creating conversations integrations in Admin Center](https://support.zendesk.com/hc/en-us/articles/4576083789850-Creating-conversations-integrations-in-Admin-Center)
### Configuration Steps
1. In Zendesk Admin Center, navigate to **Apps and integrations** > **Integrations** > **Conversations integrations**
2. Click **Create integration** and give it a descriptive name (e.g., "IrisAgent Integration")
3. Configure the webhook settings:
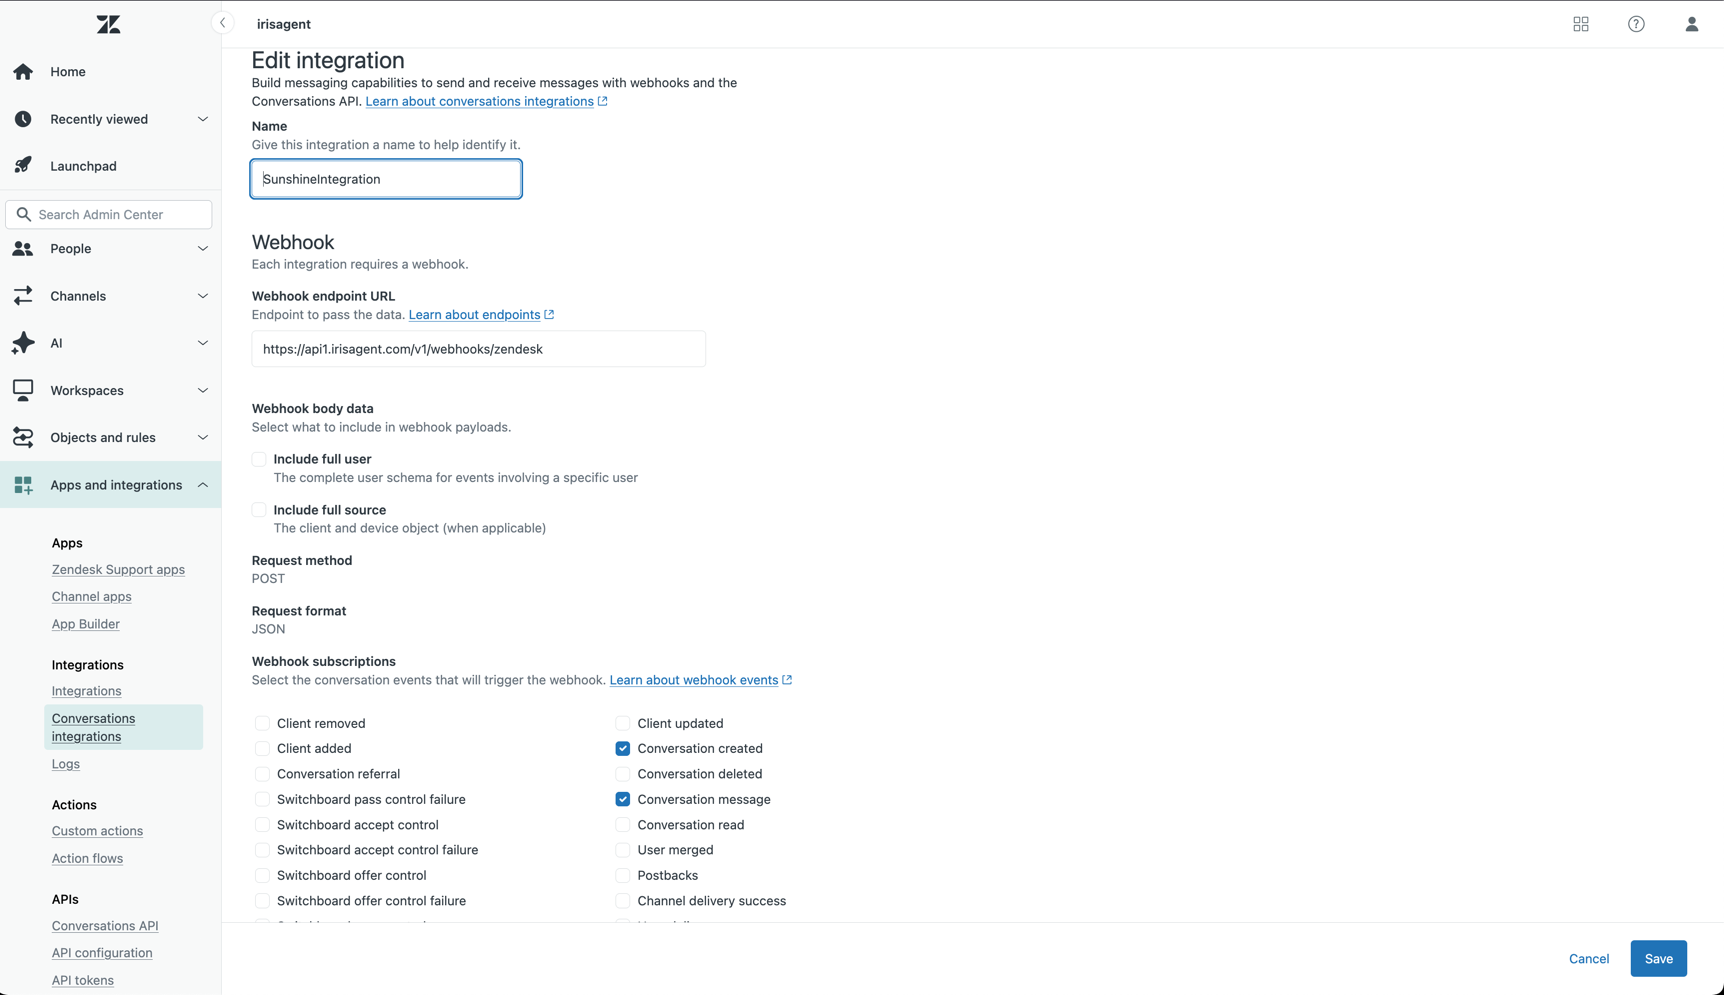 **Webhook Configuration:**
* **Target URL**: `https://api1.irisagent.com/v1/webhooks/zendesk`
* **Event Subscriptions**: Select the following events:
* ✅ `conversation:create` (Conversation created)
* ✅ `conversation:message` (Conversation message)
4. Click **Save** to create the integration
### Record Integration Credentials
After saving, you'll need to collect the following information:
| Credential | Description | Where to Find |
| ------------------ | -------------------------------------------- | ------------------------------------------ |
| **App ID** | Identifies your Zendesk account | Integration details page |
| **Integration ID** | Unique identifier for this integration | Integration details page |
| **Webhook ID** | Identifier for the webhook configuration | Integration details page |
| **Shared secret** | Authentication password for webhook requests | Integration details page (shown only once) |
⚠️ **Important:** The shared secret is shown only once. Copy and store it securely before leaving the page.
***
## Step 2: Generate API Keys
API keys provide authentication credentials for making API calls to Sunshine Conversations.
### Creating API Keys
1. In your Conversations integration, navigate to the **API Keys** tab
2. Click **Create API key** and give it a descriptive name
3. After creation, click on the key to view the credentials dialog
**Webhook Configuration:**
* **Target URL**: `https://api1.irisagent.com/v1/webhooks/zendesk`
* **Event Subscriptions**: Select the following events:
* ✅ `conversation:create` (Conversation created)
* ✅ `conversation:message` (Conversation message)
4. Click **Save** to create the integration
### Record Integration Credentials
After saving, you'll need to collect the following information:
| Credential | Description | Where to Find |
| ------------------ | -------------------------------------------- | ------------------------------------------ |
| **App ID** | Identifies your Zendesk account | Integration details page |
| **Integration ID** | Unique identifier for this integration | Integration details page |
| **Webhook ID** | Identifier for the webhook configuration | Integration details page |
| **Shared secret** | Authentication password for webhook requests | Integration details page (shown only once) |
⚠️ **Important:** The shared secret is shown only once. Copy and store it securely before leaving the page.
***
## Step 2: Generate API Keys
API keys provide authentication credentials for making API calls to Sunshine Conversations.
### Creating API Keys
1. In your Conversations integration, navigate to the **API Keys** tab
2. Click **Create API key** and give it a descriptive name
3. After creation, click on the key to view the credentials dialog
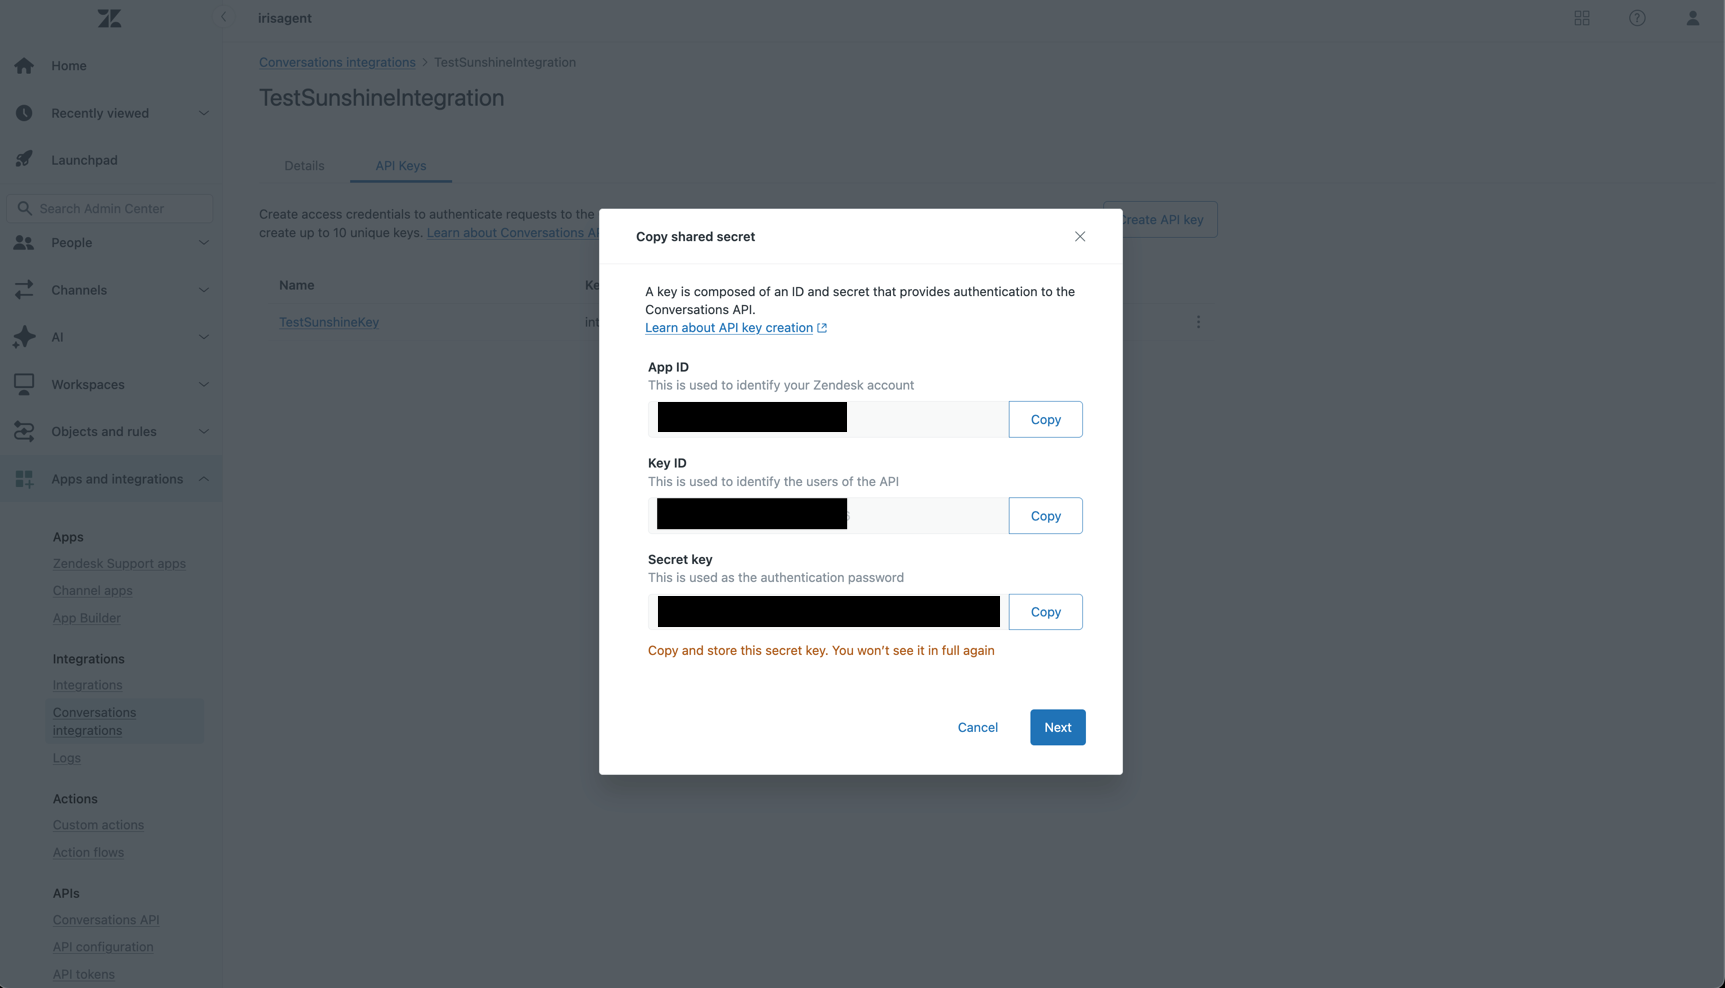 ### Record API Credentials
Copy and store the following values:
| Credential | Description |
| -------------- | ----------------------------------------------- |
| **App ID** | Your Zendesk account identifier (same as above) |
| **Key ID** | Used with the secret key for authentication |
| **Secret key** | Authentication password for API requests |
⚠️ **Important:** The secret key is shown only once. Copy and store it securely before closing the dialog.
***
## Step 3: Configure IrisAgent
Now that you have all the required credentials, configure IrisAgent to connect with your Zendesk Sunshine Conversations.
1. In the IrisAgent dashboard, open **Deploy** > **Chat** from the left sidebar
2. Find the **Zendesk Sunshine** card and click **Configure** to open the configuration panel
3. Enter all the credentials you collected:
* App ID
* Integration ID
* Webhook ID
* Shared secret
* Key ID
* Secret key
4. Click **Save** to complete the setup
***
## Step 4: Limit IrisAgent to Specific Widgets or Brands (Optional)
By default, the Conversations integration is **account-wide**. Zendesk sends `conversation:create` and `conversation:message` events for every messaging conversation in your account, across every brand and every Web Widget. That means IrisAgent will answer in all of your messaging widgets.
If you run more than one Web Widget and want IrisAgent active on only some of them (for example, on a billing product but not on a separate website product), use the **chat filter**.
You do not need a second Conversations integration, webhook, or API key for this. One integration serves your whole account, and the filter controls which conversations IrisAgent responds to.
### How the Filter Behaves
The chat filter is an **allow-list**. When it is enabled, IrisAgent responds only to conversations that match it and ignores everything else. Any widget you do not include is silently skipped.
This is useful when rolling out a new widget: configure the filter to match only your existing widgets, and a newly launched widget will not receive AI answers until you deliberately add it.
### Choose a Matching Method
Pick based on how your widgets are separated in Zendesk.
| Your setup | Match on | Filter mode |
| ------------------------------------------ | ------------------------ | ----------- |
| Widgets are on **separate Zendesk brands** | Brand ID | Simple |
| Widgets share a **single brand** | Messaging integration ID | Advanced |
Every Web Widget is its own messaging integration, so the integration ID always distinguishes them, even when the brand does not.
### Configure the Filter
1. In the IrisAgent dashboard, open **Deploy** > **Chat**
2. On the **Zendesk Sunshine** card, click **Configure** to open the **Zendesk Sunshine Configuration** panel
3. Scroll to the **Chat Filter** section and turn the toggle on
4. Choose a **Filter Mode**:
* **Simple**: enter the **Brand ID** of the brand IrisAgent should respond to. The read-only **Generated Query** field below shows the expression this produces.
* **Advanced**: enter a match expression in the **Query** field (see below)
5. Click **Save**
The **Chat Filter** section is independent of the **Enable Chat Automation** toggle, so you can set your filter up before turning chat automation on. This lets you launch with the correct scope from the very first conversation.
### Advanced Match Expressions
Advanced mode accepts an expression that is evaluated against each incoming message. The expression must return true or false, and it is validated by the backend when you save, so an invalid expression is rejected rather than silently blocking answers.
Respond only to one widget:
```
Message.Source.IntegrationID == "YOUR_INTEGRATION_ID"
```
Respond to several widgets:
```
Message.Source.IntegrationID in ["FIRST_INTEGRATION_ID", "SECOND_INTEGRATION_ID"]
```
Combine a brand and a widget:
```
Conversation.BrandID == "YOUR_BRAND_ID" and Message.Source.IntegrationID == "YOUR_INTEGRATION_ID"
```
Fields available in an expression:
| Field | Description |
| --------------------------------------------------------- | ------------------------------------------------------------- |
| `Conversation.BrandID` | Zendesk brand the conversation belongs to |
| `Conversation.ActiveSwitchboardIntegration.IntegrationID` | Integration currently handling the conversation |
| `Message.Source.IntegrationID` | Messaging integration the message arrived on (the Web Widget) |
| `Message.Source.Type` | Message source type, for example `web` |
| `Message.Content.Text` | Text of the incoming message |
A ticket field cannot be used to filter messaging conversations. IrisAgent replies to the visitor in real time, before a ticket has been created and populated, so ticket fields and tags are not available at that point. Use the brand or the messaging integration ID instead.
### Finding Your Brand and Integration IDs
* **Brand ID**: in Zendesk Admin Center, go to **Account** > **Brands** and open the brand. The numeric ID appears in the page URL.
* **Messaging integration ID**: the simplest way is to send one test message through each Web Widget, then contact IrisAgent support. Because IrisAgent already receives every messaging event, we can read the exact brand and integration ID each of your widgets reports and confirm the correct filter values with you.
***
## Verification
After completing the setup:
1. Send a test message through your Web Widget
2. Verify that the conversation appears in your Zendesk Agent Workspace
3. Confirm that IrisAgent is receiving and processing the conversation events
If you encounter any issues, verify that:
* All credentials are entered correctly
* The webhook events (`conversation:create` and `conversation:message`) are properly selected
* Your Zendesk account has the required permissions (Suite Professional plan or above)
* If you configured a chat filter in Step 4, the widget you are testing from actually matches it. A filter that matches no conversations will silently stop all AI answers
***
## Additional Resources
* [Zendesk Messaging Documentation](https://support.zendesk.com/hc/en-us/articles/4408827701530)
* [Conversations Integrations Guide](https://support.zendesk.com/hc/en-us/articles/4576083789850)
* [Sunshine Conversations API Documentation](https://developer.zendesk.com/api-reference/conversations/)
### Record API Credentials
Copy and store the following values:
| Credential | Description |
| -------------- | ----------------------------------------------- |
| **App ID** | Your Zendesk account identifier (same as above) |
| **Key ID** | Used with the secret key for authentication |
| **Secret key** | Authentication password for API requests |
⚠️ **Important:** The secret key is shown only once. Copy and store it securely before closing the dialog.
***
## Step 3: Configure IrisAgent
Now that you have all the required credentials, configure IrisAgent to connect with your Zendesk Sunshine Conversations.
1. In the IrisAgent dashboard, open **Deploy** > **Chat** from the left sidebar
2. Find the **Zendesk Sunshine** card and click **Configure** to open the configuration panel
3. Enter all the credentials you collected:
* App ID
* Integration ID
* Webhook ID
* Shared secret
* Key ID
* Secret key
4. Click **Save** to complete the setup
***
## Step 4: Limit IrisAgent to Specific Widgets or Brands (Optional)
By default, the Conversations integration is **account-wide**. Zendesk sends `conversation:create` and `conversation:message` events for every messaging conversation in your account, across every brand and every Web Widget. That means IrisAgent will answer in all of your messaging widgets.
If you run more than one Web Widget and want IrisAgent active on only some of them (for example, on a billing product but not on a separate website product), use the **chat filter**.
You do not need a second Conversations integration, webhook, or API key for this. One integration serves your whole account, and the filter controls which conversations IrisAgent responds to.
### How the Filter Behaves
The chat filter is an **allow-list**. When it is enabled, IrisAgent responds only to conversations that match it and ignores everything else. Any widget you do not include is silently skipped.
This is useful when rolling out a new widget: configure the filter to match only your existing widgets, and a newly launched widget will not receive AI answers until you deliberately add it.
### Choose a Matching Method
Pick based on how your widgets are separated in Zendesk.
| Your setup | Match on | Filter mode |
| ------------------------------------------ | ------------------------ | ----------- |
| Widgets are on **separate Zendesk brands** | Brand ID | Simple |
| Widgets share a **single brand** | Messaging integration ID | Advanced |
Every Web Widget is its own messaging integration, so the integration ID always distinguishes them, even when the brand does not.
### Configure the Filter
1. In the IrisAgent dashboard, open **Deploy** > **Chat**
2. On the **Zendesk Sunshine** card, click **Configure** to open the **Zendesk Sunshine Configuration** panel
3. Scroll to the **Chat Filter** section and turn the toggle on
4. Choose a **Filter Mode**:
* **Simple**: enter the **Brand ID** of the brand IrisAgent should respond to. The read-only **Generated Query** field below shows the expression this produces.
* **Advanced**: enter a match expression in the **Query** field (see below)
5. Click **Save**
The **Chat Filter** section is independent of the **Enable Chat Automation** toggle, so you can set your filter up before turning chat automation on. This lets you launch with the correct scope from the very first conversation.
### Advanced Match Expressions
Advanced mode accepts an expression that is evaluated against each incoming message. The expression must return true or false, and it is validated by the backend when you save, so an invalid expression is rejected rather than silently blocking answers.
Respond only to one widget:
```
Message.Source.IntegrationID == "YOUR_INTEGRATION_ID"
```
Respond to several widgets:
```
Message.Source.IntegrationID in ["FIRST_INTEGRATION_ID", "SECOND_INTEGRATION_ID"]
```
Combine a brand and a widget:
```
Conversation.BrandID == "YOUR_BRAND_ID" and Message.Source.IntegrationID == "YOUR_INTEGRATION_ID"
```
Fields available in an expression:
| Field | Description |
| --------------------------------------------------------- | ------------------------------------------------------------- |
| `Conversation.BrandID` | Zendesk brand the conversation belongs to |
| `Conversation.ActiveSwitchboardIntegration.IntegrationID` | Integration currently handling the conversation |
| `Message.Source.IntegrationID` | Messaging integration the message arrived on (the Web Widget) |
| `Message.Source.Type` | Message source type, for example `web` |
| `Message.Content.Text` | Text of the incoming message |
A ticket field cannot be used to filter messaging conversations. IrisAgent replies to the visitor in real time, before a ticket has been created and populated, so ticket fields and tags are not available at that point. Use the brand or the messaging integration ID instead.
### Finding Your Brand and Integration IDs
* **Brand ID**: in Zendesk Admin Center, go to **Account** > **Brands** and open the brand. The numeric ID appears in the page URL.
* **Messaging integration ID**: the simplest way is to send one test message through each Web Widget, then contact IrisAgent support. Because IrisAgent already receives every messaging event, we can read the exact brand and integration ID each of your widgets reports and confirm the correct filter values with you.
***
## Verification
After completing the setup:
1. Send a test message through your Web Widget
2. Verify that the conversation appears in your Zendesk Agent Workspace
3. Confirm that IrisAgent is receiving and processing the conversation events
If you encounter any issues, verify that:
* All credentials are entered correctly
* The webhook events (`conversation:create` and `conversation:message`) are properly selected
* Your Zendesk account has the required permissions (Suite Professional plan or above)
* If you configured a chat filter in Step 4, the widget you are testing from actually matches it. A filter that matches no conversations will silently stop all AI answers
***
## Additional Resources
* [Zendesk Messaging Documentation](https://support.zendesk.com/hc/en-us/articles/4408827701530)
* [Conversations Integrations Guide](https://support.zendesk.com/hc/en-us/articles/4576083789850)
* [Sunshine Conversations API Documentation](https://developer.zendesk.com/api-reference/conversations/)